If you’re an audiophile, you definitely appreciate listening to sounds of the highest quality there is. This article will meet your needs as to all you need to know about a vintage record player. To fill the pages of understanding on how to use a record player, it is important that we not only define it merely but also plunge down into its roots and interesting evolution. Trusted Source History of Record Players (A Look At 100 Fascinating Years) Learn the full history of record players: how they came to be and were developed, how they've evolved over the last one hundred years, and what modern features turntables now offer. toprecordplayers.com
Otherwise known as a phonograph in earlier times, gramophone or a record player since the 1940s, it can be said in a simple sense to be a device for reproduction and recording of sound in a mechanical form. The famous American inventor and businessman Thomas Edison in 1877 invented the phonograph when he understood that sound is the vibration of particles across a medium like in waves and air. This phonograph is the grandfather of what has overtime metamorphosed into the modern-day record player.
A high ratio of people knows how to use a record player, but it should be borne in mind that not everyone knows how to operate one correctly, and when this happens, the damage will be caused to your prized record. The succeeding paragraphs entail instructions that will guide your step on how to use a record player.
Parts of a Record Player
 There is almost no way around correctly knowing how to set up your record player without having a knowledge of the basic parts. Whether you need to assemble your turntable or not, it is nice to get yourself familiarized with parts of your new record player. Regardless of the brand or model, whether a modern unit, a vintage-style turntable, most record players come with the same components.
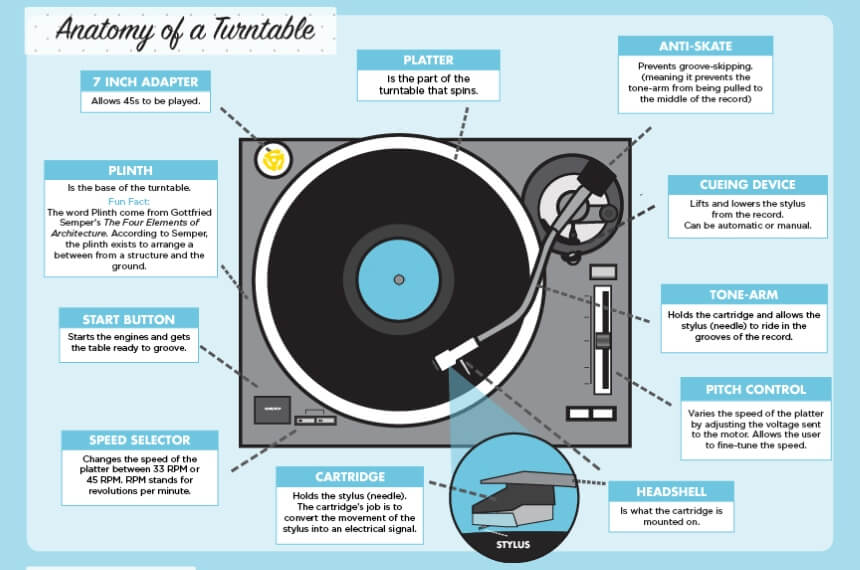
At the center of your record playing experience comes the turntable, which of in other parlances, is regarded as the platter, is metaphorically the glue that holds vinyl records and spins them at a consistent speed. Aluminum, among other metals, is mostly used to make a record’s turntable. Most judicious producers of a record player will cover the turntable with plastic to guide against static or scratches, which can damage a record.
The turntable requires support, and that is why the plinth comes in. it is the base of the turntable, which provides a space for everything to sit comfortably on. Its major technical work is to act as n absorber to the vibrations.
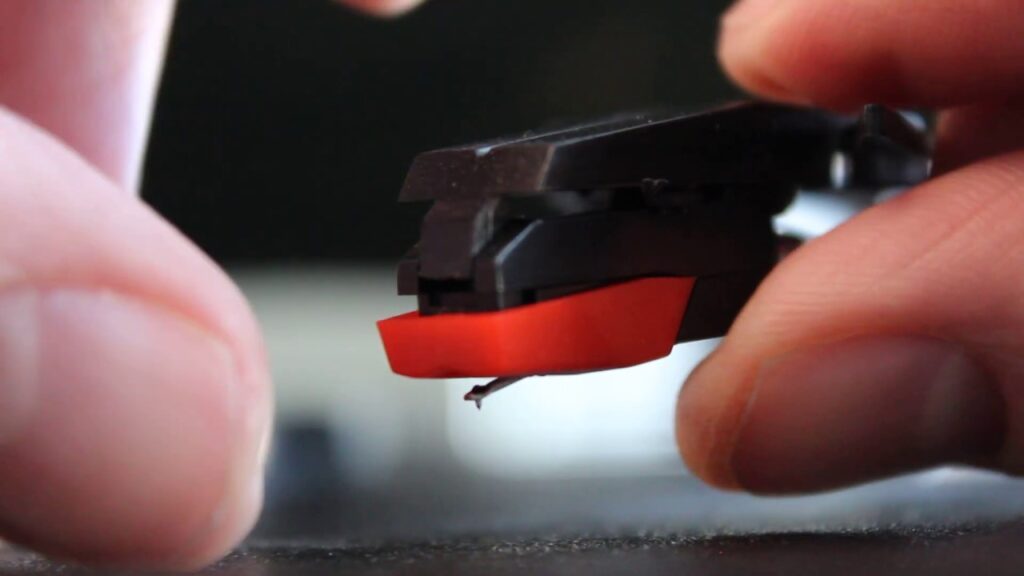
The arm as part of the component of a record player consists of two parts, which are the needle and the cartridge. The needle has a diamond tip that runs along the grooves of the record, creating vibrations that are in turn sent as a command to the cartridge. On the other hand, the cartridge converts the vibrations to an electric signal with the help of a contained magnetic field.
The preamplifier functions to boost the weak signal from a record player to the same level as other sound signals like your receivers/speakers. Your preamplifier comes in one of four places. It can either come as a separate outboard part, inbuilt into your turntable, inbuilt into your speakers, or into you’re A/C receiver. It is recommended that if you are fresh to vinyl records and you’re looking to buy your first record player, it is usually best to have an inbuilt preamp in your turntable.
As soon as you have a turntable and a preamplifier, you need an amplifier to connect in order to boost the signal to a line-level signal. When choosing an amplifier, you have many considerations to take into account since they vary considerably in value, specifications, and features.
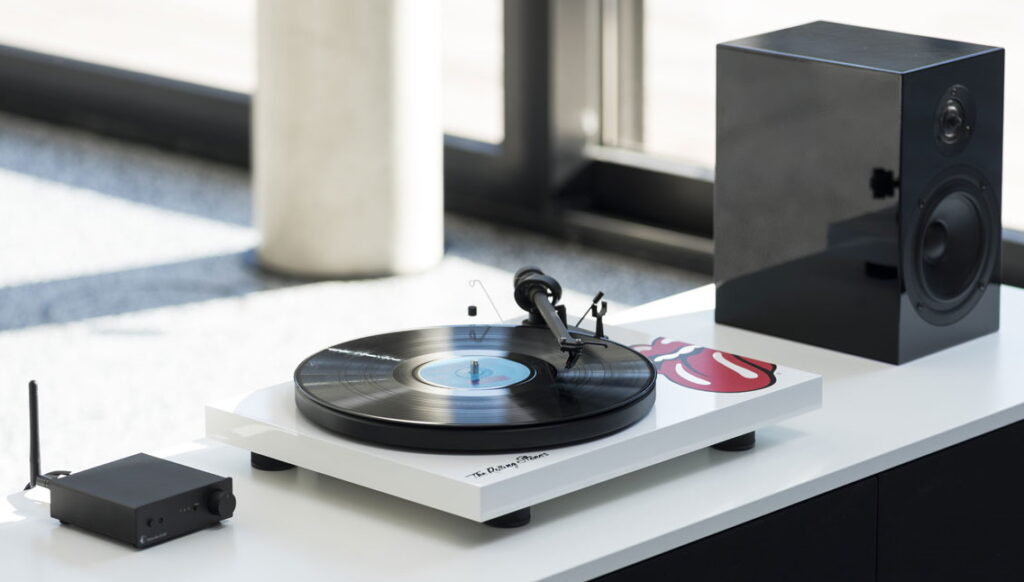
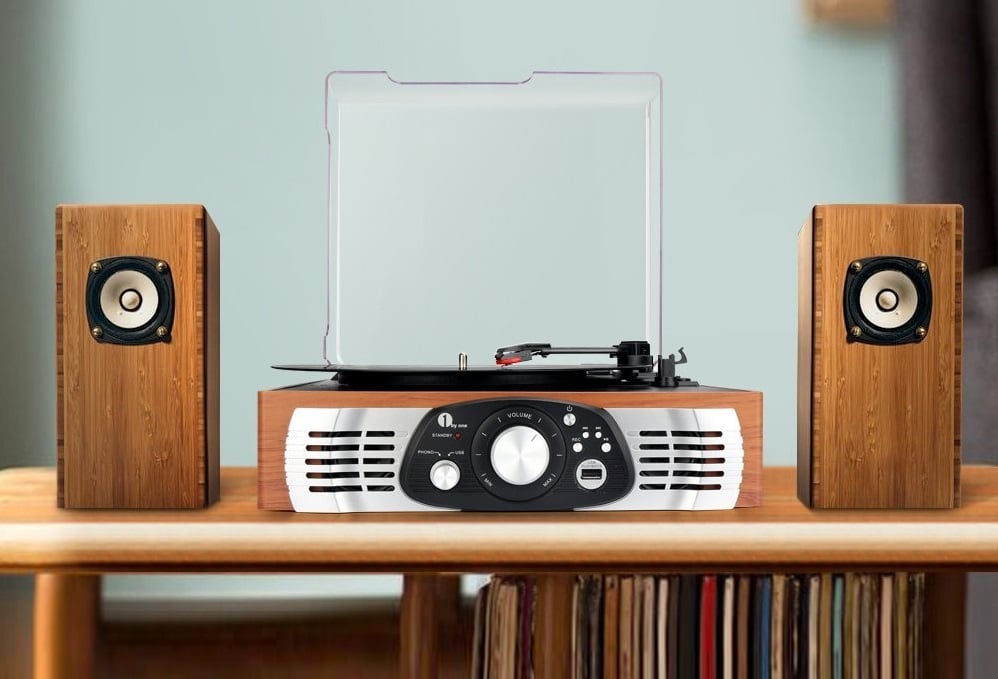
Speakers are like the mouth through which the sounds finally get to be realized. If you, by chance, get a record player with built-in speakers, then you’ll be in the business of playing your records right at the instant. If that’s not the case, you will require the facilities of an external speaker. On the market, there are two major types of speakers to play the music from your turntable. They are passive speakers that do not have their own built-in amplifier and are powered by a separate amp and powered speakers, which allows you to plug your turntable directly. Setting up the speakers is simple since all you need to do is plug the speakers using the red and white RCA cables directly into your record player. There are makes of record players in the market furnished with Bluetooth connectivity hence leaving out the need for extra wires and cables. One of such products that incorporate style with the updated modern feature of wireless connectivity is the DIGITNOW Bluetooth Record Player Turntable with Stereo Speaker.
Even though there are turntables that have inbuilt speakers, it is advised that you might still want to add a good set of external speakers to the set. This is because generally, the inbuilt speakers might not be as loud as you’d want them to be speaking in the angle of sound quality.
How to Set Up a Record Player
Having briefly learned the components that make up a turntable, it is important to know how to set it up. The good news about this guideline is that setting up a new record player is not as complicated as it appears to be. As a widely accepted rule, all turntables characterize intricate, moving parts, and that is why this section of the guide has been put together to make known the best way to set up a turntable. Like we said in the earlier part of the previous section, some turntables come pre-assembled, but for the sake of these guidelines, it has been supposed that you need to put together your new record player from the start. Note that this assembling does not require any technical know-how, so there’s absolutely no cause for alarm!
Plugging the preamplifier
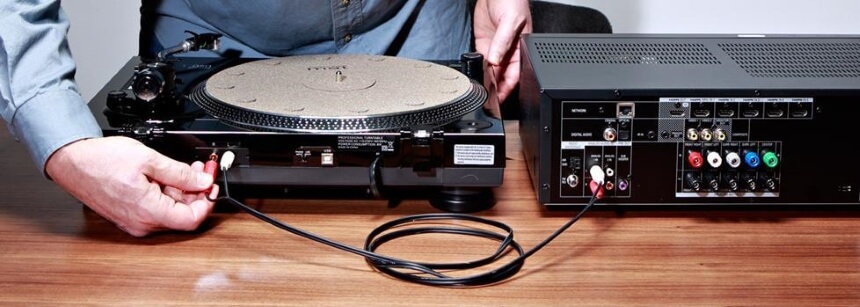 First things first, you have to link the various fragments of the record player set up together. In case you’re bought a turntable lacking an inbuilt preamplifier, you will have to plug the preamp into the turntable’s port with the use of an RCA (a cable that carries left and right channel signals) cable. In the case where the preamp comes as an inbuilt component in the turntable, you will have to plug the speakers directly into the back.
Fastening the belt
If anything, it is noteworthy to state that the belt has no twists in it so as to help the platter spin smoothly. If your record player is driven by a belt, you’ll have to award such belt to both the platter. Raise the dust cover up, remove the safety mat, and take off the platter, then gently turn it bottoms up, slipping the belt to its underside. After this, the next step is to put the platter back on the spindle and, in turn, pull the belt over the square-opening in the platter. After, you need to attach this belt around the motor. Then you can place the mat in its initial position – the platter.
Balancing the tonearm
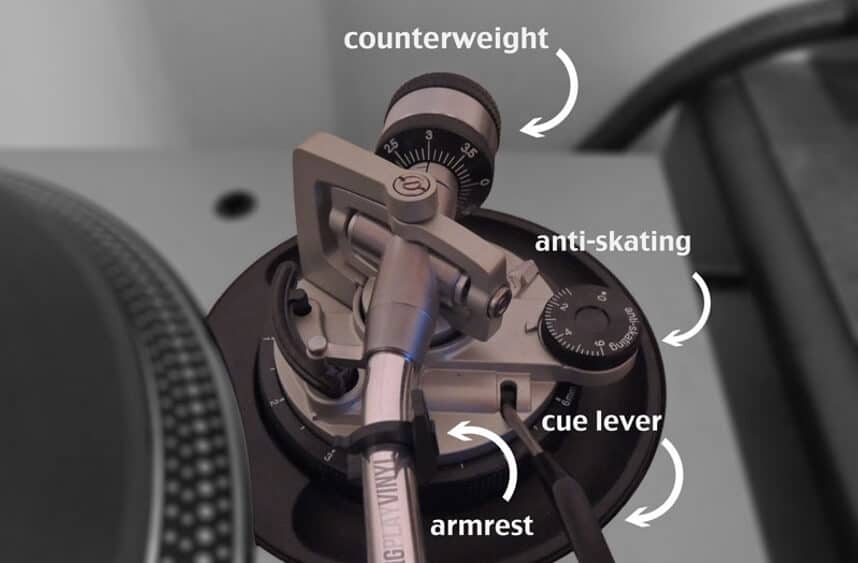 The next step to take in your quest of setting up a record player is balancing the tonearm. Primarily, your record player should be unplugged from the power source so it does not start spinning occasionally. Second, establish its anti-skate control to zero, then exercise great caution in lifting the tonearm from its position because serious damage could be wrecked to the needle if manhandled. Wondering how to go about this? Move the counterweight at the tonearm’s bottom back and forth till the tonearm is sitting leveled without you supporting it.
Setting the tracking weight
The tracking weight of a record player is said to be the force at which the record player’s stylus/needle sits on the record. You can fine-tune the tracking force (otherwise referred to as the tracking weight) to the cartridge according to the manufacturer’s advice to avoid bringing damage to your precious vinyl.
You will definitely find it worthwhile if you pay undivided attention here as setting the tracking weight can be a little tricky because if it is too low, the tracking force will dampen the tune, and this will cause an alteration, and if it is too high the needle will jump out of the grooves and spoil your record.
Now change your tracking weight measure (a numbered dial that forms part of the counterweight itself) to zero since your tracking weight is at the effective level. Now put the tonearm back to its initial position and put the anti-skate (a small numbered wheel next to the tonearm) control dial at that same number you have put the tracking force to.
Spinning your Record
You probably guessed the next step on this guideline right. The end that has justified the means, and that is you enjoying your records!
The simplest of all steps is to turn the turntable back on, put your record on the platter and choose the speed setting. Press play, then increase the tonearm’s cueing lever, make the tonearm conform with your record, then lower the cueing lever till the tonearm falls and the needle relaxes on your record.
It is our pleasure to announce to you that if you have followed the step by step guide correctly, you will do your rest and relaxation more efficiently with the resonant sounds of your music on the record player.
How to Play a Record
It is not enough to know just how to set up a record player since it will put one of the major reasons for reaching the desirable conclusion of listening to good music out, and this article will be left in jeopardy.
In the following paragraphs, you will find basic tips that will put you through the process of setting up your turntable and playing your record the right way.
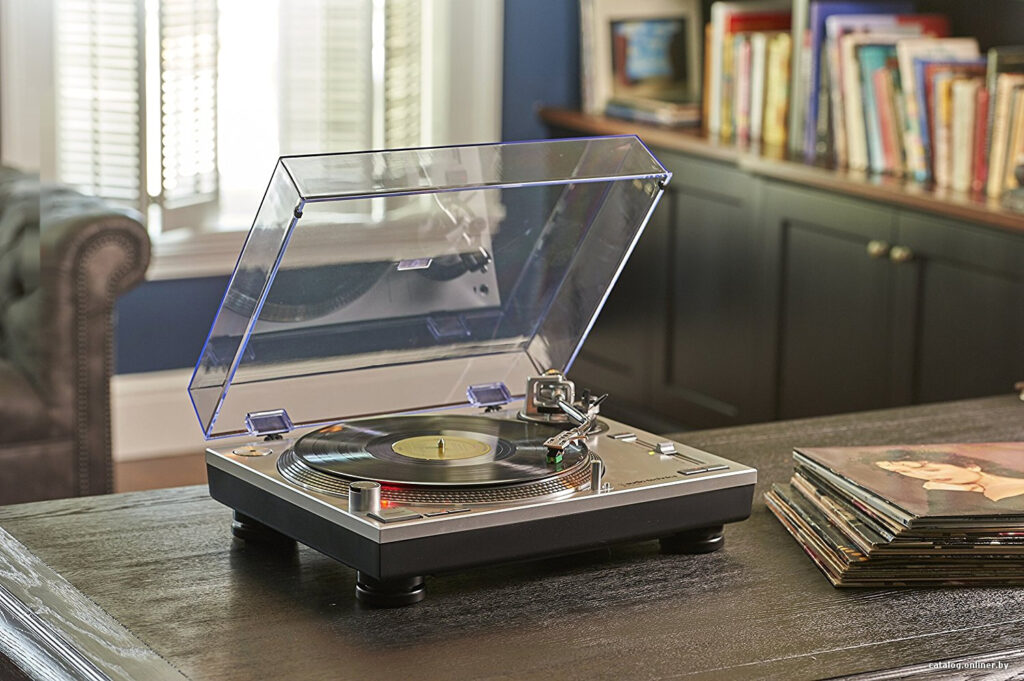
The foremost step is to remove the dust cover since most brands come with a plastic dust cover that protects the record player’s parts from dust, dirt, or debris (conforming to the rule that dust is your record’s enemy) that could alter the good working condition of the record player. If your dust cover is hinged, you can just raise the cover and lower it again as the record spins and if it is unhinged, place the cover somewhere safe until you are done playing your vinyl.
The next procedure is to place the vinyl on the record player. Be certain you’re holding the record only on the edges to avoid damage even when you take it out of the jacket, then place it carefully on the platter.
Cue the tonearm by lifting the tonearm. Thankfully, a lot of models out there have a cueing feature, which in turn allows you to turn on the switch that lifts the tonearm and places it on the vinyl automatically. There are other brands that have a cue leveler used to raise and lower the arm and other models that lack a cue switch, which you operate by lifting the tonearm off the rest then place your finger under the handle. Now you can move the arm to the outer edge of the record.
Next up is spinning the platter by flipping the switch. Although the controls of the switch differ from one model to the other, most of the record player there is have a switch to involve or disengage the motor that drives the platter. The switch also controls the record’s speed if you set it up in that manner. If your turntable has these controls, then you’ll have two or three-speed options in addition to the off position.
Remember to place the vinyl back to its appointed resting place when you are done playing the vinyl. In the event where you want to play the second part, whether A or B of your vinyl, just flip it over and follow the same guidelines as stated above.
With the record spinning and the tonearm in position, you can use the lever cue to lower the arm, bringing the needle into contact with the record. Once there is a contact, you are in contract to listen to your premium music happily!
How to Skip Tracks
 Back in the days, there were turntables that worked together with remote control and allowed you to select the track you wanted to play. One of such is the
Sharp Optonica RP-9100
Trusted Source
Optonica - Wikipedia
Optonica was a subdivision of Japanese electronics manufacturer Sharp that made high end hi-fi products systems.
en.wikipedia.org
. Recently, it has become a rare commodity to see a remote control as part of a record player component. Still, some modern models, like the Teac LP-R550USB, come with remote controls to make things easier.
Back in the days, there were turntables that worked together with remote control and allowed you to select the track you wanted to play. One of such is the
Sharp Optonica RP-9100
Trusted Source
Optonica - Wikipedia
Optonica was a subdivision of Japanese electronics manufacturer Sharp that made high end hi-fi products systems.
en.wikipedia.org
. Recently, it has become a rare commodity to see a remote control as part of a record player component. Still, some modern models, like the Teac LP-R550USB, come with remote controls to make things easier.
If your model doesn’t come with one, you are then posed with the question: “how do I change songs on my record player?” you don’t have to worry; this section of the article covers you.
With your eyes marking out details, you need to successfully identify where the song you want to play is on the record. The start of a song is distinctive with the help of a separating gap between each track on the record’s surface. As an addendum and for the purpose of detailing, you can look up the tracklisting on the record sleeve so you can easily know where you need to place the stylus. You should then proceed to remove the stylus from the playing surface while the record is still spinning. You have to lift the stylus while the record is still spinning to avoid exposure to the heat built up in the stylus.
The next step in the guide to skipping tracks is moving the tonearm to the desired track and prepping it to be lowered so that the stylus comes in contact with the record at the start of the selected song. The final step is lowering the tonearm with the use of the cueing lever or use your hand if it is steady enough.
Sometimes, beginners are scared to change tracks due to the fact that doing it so incorrectly can be consequential and lead to a scratched record. However, if you go slow and familiarize yourself with the way your record player works, you will be able to wrap your head around the workings and soon be moving from track to track.
Frequently Asked Questions
- Do I need to clean my vinyl?
By all means, please! Sometimes most people are care-free and think it’s normal to hear a cracking sound when playing, but the truth is these funny sounds are a reason for a dirty record.
- How do I store my vinyl appropriately?
Records are delicate and require a specific way of storage. That’s why you need to store them in an upright manner and evade placing your records on each other.
- Are there factors to consider before choosing a turntable?
Definitely, you need to put some guiding factors as a prospective buyer into consideration, some of which include: is it drive or belt driven? Is it manual or automatic? Do you need a preamp? What about inputs? Is it upgradable? And so on.
Final Thoughts
Congratulations on your inauguration into the fold as a new audiophile! As a prospective buyer, there are myriads of record players you can make a pick from on the market. Now that you are fully aware of how to use a record player based on the provisions of this article, we suppose there is no harm bearing in mind little tips such as bearing in mind that changing the speed record is reliant on the size of the record you’re playing, avoid scratching it and always keep your vinyl clean for high sound quality.