Welding may seem easy, but it requires expertise, skill, and attention to detail. Just one slip-up in the process can damage the material being welded or even lead to welding defects, which means there’s no room for error while welding.
The defect may vary from the material’s expected shape, size, and quality. These defects can develop outside and within the weld metal.
We sometimes ignore some flaws within permissible limits, while others, like cracks, are never ignored.
In this article, we’ll discuss some of the most common welding defects, their causes, and remedies so you can prevent them from happening in your projects.
Let’s take a closer look at some of the most common welding defects and what you can do about them!
A welding defect is any imperfection that is caused by a flaw in the welding process.
There are many welding defects: surface, internal, and residual stress corrosion cracking.
The type of defect will depend on what part of the welding process it was created from. Surface defects come from irregularities at the joint itself. Internal defects occur when contamination or impurity is left inside the weld metal or slag layer.
Residual stress corrosion cracking occurs when two pieces have been welded together, but one or both ends have not been allowed to cool sufficiently before being joined together. The result is a crack that can be very difficult to identify unless you’re looking for it.
Residual stress corrosion cracking often appears as transverse cracks, which run along the weld length rather than through it as longitudinal cracks do.
Although these problems are rare with modern equipment and properly trained professionals, they can be very difficult to fix once they happen because of how difficult they can be to see until after the damage has been done.
As we mentioned earlier, welding defects fall into two major categories: surface and internal.
We’ll look at each one of them, their causes, and how to mitigate such defects when you come across them during your project.
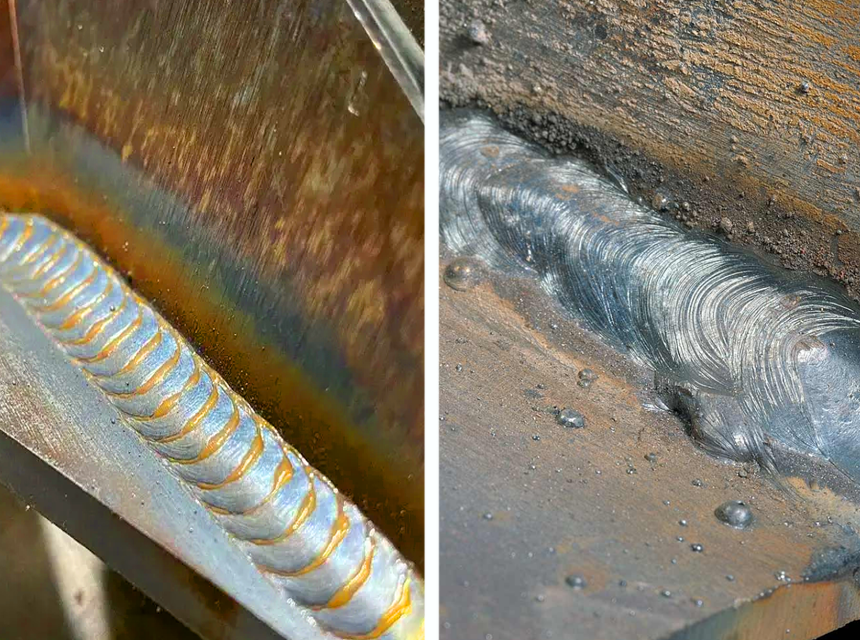
When filler metal is used that is too hot, this can cause porosity in the weld bead.
This is because the filler metal cools and contracts too quickly as it solidifies, creating a void between the base metal and the filler metal.
A weld will have a pockmarked or cratered appearance in cross-section with shiny spots on its surface that appear pitted.
1. Too hot of a filler metal: When you use a filler metal that is too hot, it will cool down too fast when it solidifies, creating porosity defects. If a filler metal has too high a thermal conductivity compared to the base material, welding defects such as porosity will form on your weld joint.
2. Increased welding currents: Higher amperage rates in certain circumstances (high voltage, for example) increase the chance for weld defects such as porosity.
3. Not enough shielding gas: Shielding gas is needed to stop oxygen from coming in contact with molten metal. Without shielding gas, enough heat may still get through the shield causing excessive oxidation, which can lead to porosity and other welding defects.
4. Rust or oil on the welding surface: Rust or oil can cause porosity defects. When welding, you should always check your surface for rust or oil; if there is any, wipe it off thoroughly with a cloth before you begin to weld. Plus, you should also consider using the best mig welders for a more pleasant experience.
An undercut Trusted Source WELDING DEFECTS!! Porosity, Arc Strikes, Undercut - YouTube Today we’re talking about some of the biggest weld defects that we see and how to avoid them www.youtube.com is characterized by a significant reduction in the size of the parent metal along with heavy porosity or, in plain English, huge cavities.
1. Excessive penetration of electrode into parent metal: The high heat generated during the welding process can cause melting of the base material that leads to excessive penetration of electrode into the parent metal. The heat from this melted base material fuses with the current electrode, which results in the formation of an under-sized weld bead.
2. improper electrode extension: Improper electrode extension may result due to insufficient electrode holder rotation during the welding process. If the electrode is not fully extended from the gun nozzle when it comes across parent metal, it starts melting base material due to excessive heat. It results in the formation of an under-sized weld bead. It fails to protect the edge of the weldment from outside elements like pressure or stress.
3. Too deep an initial piercing: On rare occasions, too deep an initial piercing can lead to undercutting because it makes it difficult for shielding gas to fill up underneath the arc column.
This is a crack in a weld or the base metal. A crack usually happens because there is a lack of fusion between two pieces of metal or because there was too much heat from a torch used for welding that caused it to cool down too quickly.
These cracks could occur in different temperatures:
Hot crack: Hot cracks occur when the cooling rate is too rapid, most common with thick materials like metals (steel).
Cold cracks: Cold cracks happen with thin materials, which are called cold cracks. Cold cracks happen more often than hot ones because the difference between the cooling rate of thinner materials versus thicker ones isn’t as big.
There are a few reasons why weld cracks happen.
1. Lack of penetration: The first cause is a lack of penetration in which the molten weld pool doesn’t penetrate deep enough to reach the base material.
2. Nozzle set too high: Another reason for this could be that the nozzle on your gun was set too high, so it created an excess amount of slag which had very little contact time with the molten material
3. Parts not heated evenly: The third cause can be low fusion, where some parts weren’t properly heated up before they cooled off.
4. Low joint design: Finally, another cause is a poor joint design which causes stress concentration in areas of least strength.
A type of surface weld defect where the fusion is incomplete, caused by improper electrode manipulation or faulty equipment settings. The result is an irregular weld bead with a concave or convex shape on its top edge.
Low heat input: It can be due to a low amperage setting that would cause minimal penetration, which results in reduced heat input. With low heat input, it becomes hard for the arc current to get hot enough for proper melt-pool formation, which eventually leads to inadequate melting of filler wire.
Improper bead position: Improperly placed beads can create a “tail” or unconnected area at the end of the weld line. These ‘tails’ do not have enough metal to produce meaningful fusion. If this occurs, repeat the process with a new bead until satisfactory welding is achieved.
Incorrect electrode: Electrodes with incorrect diameter can either let too much filler wire protrude out of the groove (excess) or insufficient (deficiency). Either case leads to an inferior bond and, if left unattended, could give rise to other defects like undercut and lack of fusion.
Slag is a compound of metal oxides that form during welding. During solidification, slag separates from molten metal. So yes, it won’t interfere with further solidification or create internal defects.
Slag inclusion can be caused by several factors, including improper grinding, lack of shielding gas, bad technique, and high spatter levels. In addition, they’re often found in weld joints where there’s no preheating because they were buried in the joint before preheating.
This defect can be mitigated by performing additional cleaning after welding, which should eliminate any residual slag left on the weld bead and inside the weld joint.
Make sure not to cut away too much material around the weld bead; this will leave an opening for more slag to enter.
To begin with, incomplete penetration is a type of defect where the weldment has not been penetrated properly. As a result, you’ll see voids and porosity in your weldment.
The primary cause is insufficient penetration by too little current or arc length (distance between the tip and workpiece).
To fix this problem, ensure you use enough power on your equipment to penetrate through the metal being welded.
As for arc length, it may be too long for a particular joint – in that case, try to reduce it by moving closer or farther away from what you’re welding.
These are small flecks or balls of molten metal that pop out while you’re welding. When the metal drops that pop out remains on the surface, the phenomenon is referred to as a spatter.
The issue with this type of defect is usually caused by a lack of shielding gas coverage over the weld area. However, it may also be caused by too little penetration, poor arc striking and arc stability, or a dirty flux or electrode.
To solve it, make sure your shielding gas is clean (or set up your weld-prep, so you get a stable arc right off), and replace dirty consumables like electrodes/fluxes (sticking electrodes will cause spatters). If none of these work, keep increasing gas pressure until they stop popping out.
Distortion defects result when heat isn’t controlled during a process. Whether it is excessive or not, enough heat applied during welding will determine how large a distortion defect will be.
Another factor determining the size of a distortion defect can be attributed to the metal types used.
Heat levels that aren’t maintained throughout the process. Welders don’t cool down the area; they weld before continuing. The metal type could also play a role in determining how bad this type of defect will be.
Cooling must be done through an alternate method after welding has been completed. One way is by using dry ice, which must be stored in an airtight container since dry ice sublimates quickly.
If a weld is not sound due to some mechanical damage, it must be ground away for a new weld to be done on the spot. Sometimes this damage may also require additional metal to be added as well.
A mechanical defect can occur if a part or piece of material is moved during welding or if something could potentially contaminate the surface that’s being welded.
Ensure everything around the area is stable before proceeding with the welding process. Make sure any contaminants have been removed from the area to be welded by scraping off any paint, dirt, rust or anything else that might interfere with the joint.
This is a welding defect where some part of the weld is not aligned with other parts. It could be that your welding machine was misaligned during welding, or you didn’t clamp your work correctly.
When that happens, a slight misalignment can occur, resulting in an undesirable flaw in your weld.
It usually happens because of a misalignment in the process or improper positioning during welding.
To fix this problem, try adjusting the position of your workpiece so that it matches up with the entire weld seam. Also, adjust the position of your shielding gas nozzle while continuing to torch the metal.
A weld with excess reinforcement or overlap will not have an even appearance on both sides of the weld but rather a noticeable difference in texture on either side.
A common cause for this defect is an inadequate welding procedure – perhaps too much gas or no gas.
The remedy for this defect is fairly simple—cut away any excess reinforcement before continuing with the welding process. Then, you can use a chipping hammer and chip away the extra metal that needs removal.
One type of surface defect is known as overlap. The word overlap is self-explanatory – an area where the weld overlaps with itself or a previous weld.
It’s typically caused by an uneven distribution of heat from the torch and can be remedied by using filler wire or just wiping down the area with a grinding tool.
You’ll need to use solder for minor repairs on metal surfaces. First, you will need flux for these types of repairs. Flux works as an intermediary between metal pieces that need to be joined together to form a strong bond (through which molten solder will flow). Secondly, use less welding current.
These thin filaments protrude from a weld joint with different compositions on either side.
They can be caused by the excess presence of elements like copper or nickel in the base material, lack of penetration due to a lack of shielding gas flow, excessive heat input, and other factors.
Use a metal filler rod that melts onto both sides of the whisker, preventing it from forming again. You should also ensure not to overheat or under-penetrate the metal, as it can result in more whiskers.
Welding defects can be revealed by performing a non-destructive inspection of the welded joints. These inspections may be visual inspections or radiographic inspections.
Visual inspections often look for defects such as slag inclusions, entrapped gases, porosity, undercutting, heat-affected zone (HAZ), and lack of fusion.
The radiographic inspection involves using an X-ray to inspect the weld joint.
You should be able to tell the difference between a weld discontinuity and a welding defect. Discontinuity is usually due to an interruption in the arc or the process of starting, stopping, or moving the electrode. The metal that has been heated may then cool down too quickly, causing cracking.
On the other hand, a defect is usually caused by an error in the welding procedure, such as poor contact between electrode and metal or lack of filler material.
This is why it helps to have tools like the Everlast PowerMTS 251Si or the Hobart Handler 140 for your welding needs.
In the welding industry, it’s important to identify weld defects Trusted Source What Is Weld Quality Testing?- 10 Common Weld Defects - Engineering Choice Welding Defects can be defined as the irregularities formed in the given weld metal due to wrong welding process or incorrect welding patterns, etc. 52.0.170.206 before they become a problem. Several types of weld defects can occur when welding: cold lap, penetration, undercut, lack of fusion, and burn-through.
The causes of these different types of weld defects can be attributed to many things, such as poor shielding gas coverage, improper preheat or post-weld heat treatment, or overheating during welding.
If you’re looking for a tool that won’t bore a hole in your pocket, you can invest in the best mig welders under $1000 that don’t compromise quality.
Welding is an excellent way to join materials together. However, when welding defects happen, they can be costly. Understanding the welding defects that could happen to you will help you prepare for them.
Knowing the causes of each defect and how to remediate them can save you a lot of headaches in the future.
We hope this detailed guide has helped shed some light on what welding defects are, their effects, and how you can prevent them.


