Most full-size sewing machines options from companies such as Singer, Janome, Brother and more are efficient, capable of handling the most challenging sewing jobs and are ideal for professionals. However, with all these benefits, they are still flawed in some ways. One example is that you can’t take them with you when you travel since they are bulky and cumbersome. Another is that they are quite expensive. Notably, you can avoid some of these flaws by choosing the next best alternative, a mini sewing machine.
You’ll end up giving up some of the full-size sewing machine’s capabilities though the trade-off might be worth it. You’ll also note the design of the mini machine is nowhere close to the full-size alternative in terms of features. As such, you might wonder how to use the mini sewing machine if you choose to get one. Not to worry since we can tell you everything from start to finish. Consequently, you will have all the knowledge you need to operate most mini sewing machine brands in the market by the time you finish reading this write-up.

Connect the power supply
Before you start doing anything, the machine has to be connected to a power supply. Depending on the device you have on your table, the power supply could be in battery form or a cord that you connect to a socket. For the former, the manufacturer will have placed instructions on the type of batteries to use in the manual. Also, the manual will tell you just how many batteries you need.
For the latter connect the power cable to the labelled slot on the machine. Also, confirm that the on/off switch is set to off. Countless others have forgotten this step before you and faced the consequences. Ideally, you’ll avoid being one of them as it can lead to injury or damage to the machine. If your mini sewing machine has a foot pedal, you can also take this opportunity to connect it. Notably, the foot pedal slot is almost always close to the one for the power cable.
Remember to position the pedal a comfortable distance from your feet for easy reach. After that, you can connect the machine to a working socket in your workshop using the pronged end of the power cable.
Thread the machine
 Next, learning how to use the Kenmore mini ultra-sewing machine or any other mini sewing machine brand involves getting comfortable with the multi-step threading process. The steps in question include winding the bobbin, threading the top, threading the needle, Inserting the bobbin and lastly raising the bobbin thread.
If you can complete these steps, you’ll only need to follow up by adjusting the settings to your preferred specifications before you start sewing. It may seem complex at first, but you’ll quickly get used to it.
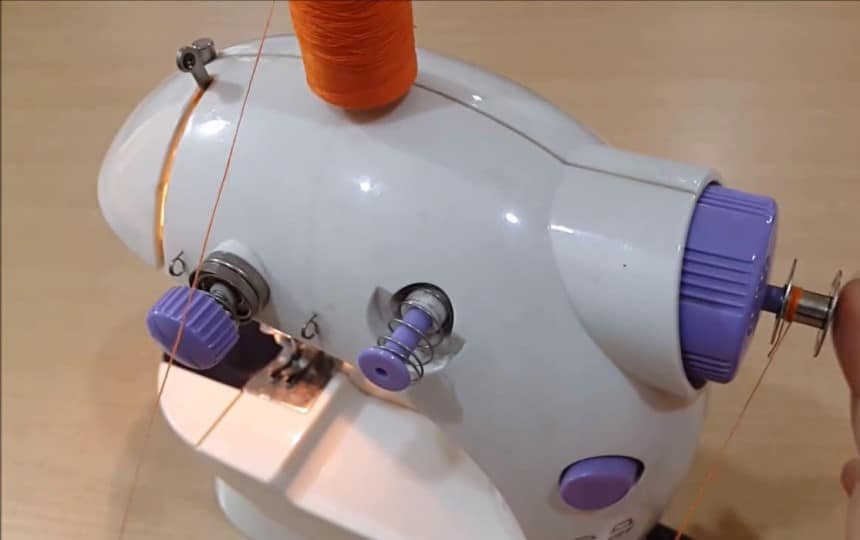
Winding the bobbin
For this part of the process, your machine will need to be turned on. Another prologue to winding your bobbin is that you need a spool of thread on the threaded spindle. The spindle is often easy to locate on the top right side of the machine and is either in the form of a small plastic or metal post.
Notably, if the spindle seems small, it’s probably because it’s a retractable option and you can pull on it, so it shows its full length. Position the thread spool on the spindle to rotate counterclockwise when you pull on the tail end of the thread.
There should also be a bobbin spindle on the right side of the machine. Take the end of the thread and push it through one of the holes on the side of the bobbin starting from in to out. Hold, the thread tail as you wind the bobbin clockwise a few times. At this point, you’ll want to put the bobbin on the bobbin spindle. Please note that the mechanism for holding the bobbin in place on the bobbin spindle can be different from machine to machine.
You can also cut the thread tail you were holding before winding it any further. Press the pedal to get the machine going as it will rotate the bobbin clockwise and in the process, it will load more thread. Keep doing this until you have enough thread then shut down the machine.
For some of these machines, you may also need to tug on the thread with your finger between the threaded spindle and the bobbin. Pull the thread towards you and move it from side to side to provide the tension needed while winding the bobbin. You can as well use a pen instead of your finger. Cut the thread, and you should be done.
Also, it has been noted that trying to wind the bobbin while there is a thread on the machine can lead to thread jamming. Avoid this eventuality by removing all threads beforehand.
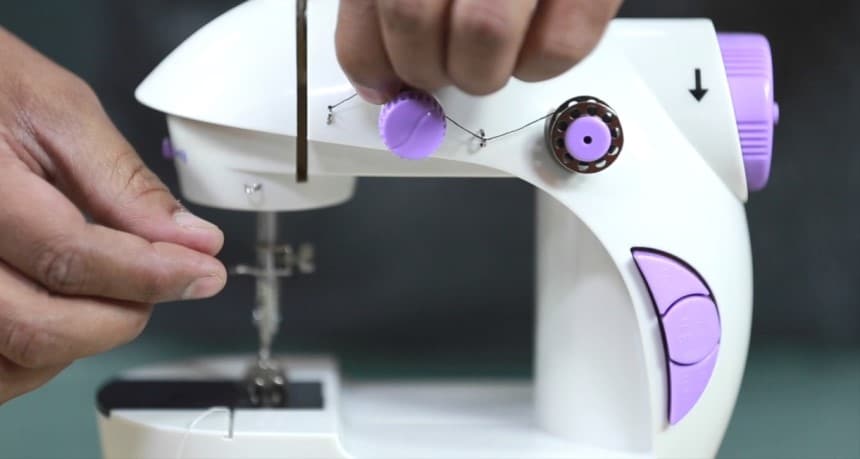
 Threading the top
 Threading the top
Similar to when you’re winding the bobbin, threading the top starts when you place a spool of thread on the appropriate spindle found on top of the machine. Alternatively, a few machine models have a secondary bobbin holder on the top of the machine that you can use in place of your regular spindle.
Hold the thread tail as you guide it through the appropriate thread guides. Usually, they will be in the form of hooks or small loops on the side of the machine. You’ll likely have to put the thread through these holes, making sure to go from right to left.
Also, for most mini sewing machines, the first thread guide is followed by tension discs. You’ll have to pull the thread firmly through this disc before proceeding to the next thread guide. After that, you’ll go through one or two more thread guides before you have to put the needle through the take-up lever.
The next thread guide should be somewhere below the take-up lever. For this one, the thread goes through from top to bottom. Right after that, another guide is available above the needle, and you will thread this from top to bottom as well.
Threading the needle
Always thread the needle when it is at its highest point and to get it there you might have to turn the handwheel towards you. Notably, the way you thread the needle will depend on the machine, and you can always refer to your manual for clarification. However, the two variations include from left to right or from right to left. After that continue pulling the tail end of the thread until you have about 15cm of loose thread.
Inserting the bobbin
Seeing as though you already wound your bobbin, you can now insert it in the bobbin case. In most mini sewing machines this case will be right under the needle, and you can slide the cover open to access it. Put in your wound bobbin and ensure that it rotates clockwise if the thread tail is pulled. You may be provided with a guide showing you where to place the thread tail right next to the bobbin case.
Raising the bobbin thread
With your bobbin in place, you can turn the handwheel towards you. This will prompt the machine to lower the needle then raise it again. By the time it comes back up, the needle will have picked the bobbin thread as well. Pull-on this until you have about 15cm of loose thread that you will then have to push to the back of the machine. Ensure that both the top and bobbin thread pass under the presser foot as they go to the back of the device.
Adjust the settings
After you’ve threaded the needle and set up your bobbin, you need to adjust the machine’s settings to make sure your stitches are just right. Start by choosing the speed of the device. This will dictate how fast or slow your needle will move up and down.
Also, you can now pick from the stitch type and length options you have on the mini machine. While the two main stitches are the straight stitch and the zigzag stitch other stitch patterns Trusted Source Stitch (textile arts) - Wikipedia In the textile arts, a stitch is a single turn or loop of thread, or yarn. Stitches are the fundamental elements of sewing, knitting, embroidery, crochet, and needle lace-making, whether by hand or machine. en.wikipedia.org in your engine can make your work easier.
According to user reviews, the DONYER POWER PORTABLE comes recommended as a high-end mini sewing machine with up to 12 stitch patterns built-in. The built-in threader in the DONYER should make your work easier as well. Lastly, turn the tension dial to achieve the stitch tension that you want. Notably, you might have to test the stitch a few times to ensure you get the stitch tension right.
Test the stitches
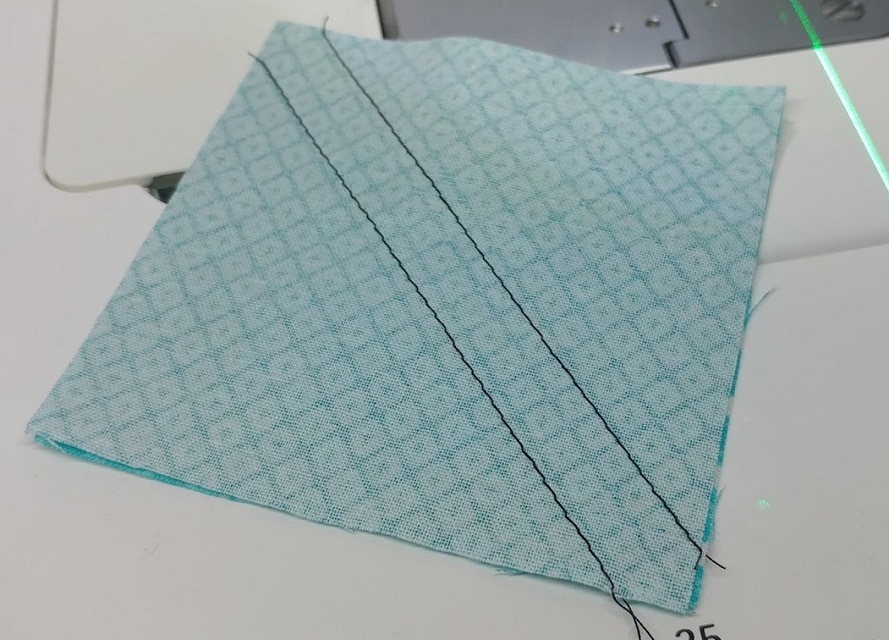
For this, you’ll need a scrap piece of fabric. Start sewing on this fabric, and if the stitches are loose on either the bottom or top of the material, you’ll need to make the appropriate adjustments. Notably, turning the tension dial clockwise will tighten the tension on the top stitch while turning it in the opposite direction will loosen it.
Start sewing
Start by positioning the fabric you’re working on underneath the presser foot and needle. You can use the handwheel to lift the needle by turning it towards you. As for the presser foot, there should be a lever on the back of the machine that you can use to raise it. Once the fabric is in place, you can lower the presser foot. You’re good to go and can start sewing.
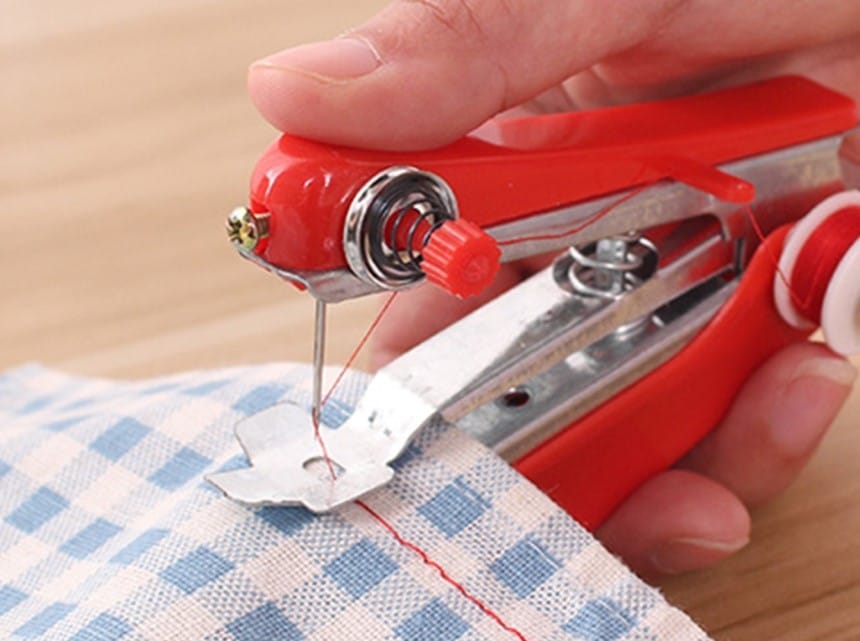
How to use mini handheld (stapler) sewing machine
You can also learn how to use a mini handheld sewing machine if you set your mind on getting one. Notably, most of these mini handheld stapler sewing machines come fully threaded and with a bobbin attached when you open the package. You can change it out for a full-size spool of thread using the provided thread spindle. Alternatively, you can wind a different thread on the bobbin and use that instead.
If you decide to use the full-size thread spool, you’ll have to install the spindle extender provided with the device. For this, you’ll unscrew the top part of the bobbin holder, screw in the extender, put in your thread spool then use the provided cap to hold the spool in place. Remember to store the unscrewed “bobbin holder cap” in a safe place for later use.
 With the thread spool in place follow the step by step guide below to use the mini sewing machine:
Step 1
Thread the machine. Ideally, the threaded spindle should rotate in a counterclockwise motion. With that said, you’ll pull on the thread tail and push it through the first two thread guides provided making sure to go through the loops from right to left. On the left end of the stapler machine, there should be what seems like small tension discs. Start on the right side, slide the thread between the discs, and pull it down.
Also, under the top part of the machine, a hook or loop serves as a third thread guide. Put the thread through this guide before proceeding to thread the needle below it. Once the needle is threaded, you’ll want to lift the fastening plate, and then you can pull the thread out from under it before pushing it to the back of the machine. Ensure you have sufficient thread tail length of about 15cm before you sew any fabric.
Step 2
This step is where you position the fabric. Lift the fastening plate again, fit a piece of fabric under it and then release it. Ensure the material is in the right position as the next step is to sew.
Step 3
Start sewing. For this, you’ll use your right thumb to push down the top part of the mini handheld machine just as you would with a stapler. Repeat the up-down motion of your thumb as you pull the machine to your right. You’ll start to see the stitches.
There are some of these handheld mini sewing machines that are battery operated. For these, you’ll fit the batteries then press the power button as you drag the device to the right. The stapler machine will then take care of the rest. The SINGER 01663, for instance, is one such machine that lots of reviewers have recommended. It also comes with extra bobbins, needles and a thread spindle if you need them.
Final thoughts
As you can see, you don’t need much to begin your sewing journey. You can start small with a stapler sewing machine then gradually upgrade until you’re using top of the line Singer machines that are the envy of the sewing world. With the step by step guides above, you’ll figure out just how to use mini sewing machines in no time at all. Remember to practice as that’s the only way you’ll progress to advanced sewing techniques.